Showing posts with label snow. Show all posts

Friday, 20 December 2013

Blogmas Day 20: Holiday is here!

So today I have finally finished college for 2013 and I can now begin to chill out for the next few weeks for Christmas and New Year! My last lesson today was English which I enjoy so much! English is like my most favourite subject in the whole wide world ever (apart from when I have to write essays...). The thought also dawned on me that this was my last college lesson of 2013... Scary stuff. 

Oh well I can relax now and watch some Christmas movies...

What's your favourite Christmas movie? Mine at the moment (apart from Robbie the Reindeer!) has to be Arthur Christmas!

REMEMBER - 3 BITS OF STICKY TAPE! (You'd get it if you've seen the film...)

So close to Christmas now!

Mistletoe Kisses

Emma Victoria

xoxox

Monday, 16 December 2013

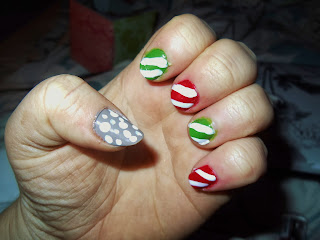
Blogmas Day 16: Candy Cane and Snowdrop Nails!

Today I'm doing a cute little nail tutorial on some super simple and adorable nails! 

Step 1 Base Coat 
First of all you want to select a red and green and paint your alternate nails in these colours. I decided to mix things up a bit and paint my thumbs grey to make them snowy nails! For the red I used Barry M Hi-Shine Gelly Polish in 'Blood Orange', Rimmel Lasting Finish nail polish in 'Green Grass', and Mavala nail polish in 'Warm Grey'. I applied around 2 coats for the red and grey and 3 for the green as the polish was not as pigmented as the other two polishes. I left mine to dry for about an hour to just make sure they were fully set. 

Step 2 Adding the Effects!
Looking at the image above you can see for the candy canes I added just 2 lines per nail as mine aren't too long at the moment! I used a thin little make-up application brush, its super thin but I still managed to get a tonne of polish on the brush, but you can make your lines thinner if you wish! Then leave these to dry.
The thumbs are super simple as well, basically just apply different sized dots onto your nail and scatter them and be super generous but still being able to see the grey! You can make these predominant or make them very vague to represent snow or both like I did! 

Step 3 Protect
Once you have let your nails dry again, you then want to get some clear nail polish just to protect the beautiful work you have just done! Et voila, you're done!

9 days till Christmas!!!!!!

Lots of Love

Emma Victoria

xoxox

Monday, 9 December 2013

Blogmas Day 9: Make Your Own Snow!


So today I thought I'd finally try out the 'Make Your Own Snow' I bought last year at Christmas but never actually used... I thought that I'd use this snow to put in my vases on my big chest of draws! Its a super simple thing to do - I bought my snow powder from my local Garden Centre for £4. All you have to do is add as much powder as you want into a bowl and then add (I think) it said about 1/5 of water from the amount of powder you have added. Me being not scientific me - I  just added the water to the point where it all just begun to start expanding....
You will need water, snow powder, and a bowl.
Then add your powder into your bowl... and add the water!!
I found it grew about 5 times bigger from the powder
 form after adding about 30ml of water!

Overall I think this is super handy if you want a 'realistic' snow effect on a window display or in a vase... The only thing I will say that this has a major chemical/plastic sort of smell if you are quite close to it - and it really does not feel like snow, it feels more like polystyrene has been crushed into a sort of maybe watery powder form? But for visual purposes this is perfect for a Christmas display!!

16 days till Christmas!!

Lots of Love

Emma Victoria

Sunday, 8 December 2013

Blogmas Day 8: Snowflake Nails


Today I thought I'd do a cute little nail tutorial the pictures aren't complimentary to what I've done but I shall try my best to explain to you best I can!
I decided to just do sparkly nails, as snow is always sparkly in the sun, right? On my thumb nails I decided to do a snowflake (like I said you can't see it too well, only vaguely). 

The products I'm going to be using are: Rimmel Clear Nail Varnish, Barry M Diamond Glitter Nail Polish, and Barry M Matt White Nail polish along with the Barry M Nail Art Pen in Silver.


Step 1: Base Coat
Apply one coat of the clear nail polish, this just gives a protective layer between the coloured polish and your nail. 

Step 2: Apply the White
Next you want to apply the white nail polish, I did 2 coats just to make sure my nails are fully covered and the white is nice and clear. I then leave these to dry for about an hour or so just to make sure they are fully set!

Step 3: Glitter & Snowflake
On the other 4 nails that you aren't putting a snowflake on, put several coats of the glitter on to make sure you get decent coverage and its super sparkly! While these are drying then use the nail art pen to draw a snowflake (I know its not the best picture in the world but you can get a rough idea from the picture on the right!). Once this has dried then add 2 coats of the glitter polish on top of your snowflake. If you wish you can add some silver dots on the other nails to represent snow like I did!

Step 4: Protect
To fully protect the nails, just add your clear nail varnish just to protect your nails from chipping and leave to dry - and voila!

We are done! I hope you enjoyed this little post!

17 days till Christmas!

Lots of Love

Emma Victoria

xoxoxox

Saturday, 19 January 2013

Snow Make-Up!

So when we have snowfall in the UK, the whole country usually goes into a meltdown, but who said you still can't look fabulous even if you do have to abandon your car or walk your dog?! When we have the snow, I have a very simple and quick make-up routine which I like to do! 

Step 1: Apply any facial products which you might use for acne or spots, always put these products on under your make-up, otherwise you will get no benefit from the usage of these products! As you can see in my other blog post 'Attack Those Spots!' I explain about the products that I use and how they benefit me personally! 


Step 2: Next apply your foundation, I use 2 liquid foundations by Rimmel. The first one I use is the 'Stay Matte' foundation in a shade 200 Beige. I usually use this as a base coat for my foundation. I usually spread my foundation very thinly onto my face and neck. The second foundation that I use is the 'Lasting Finish' foundation in 200 Beige again. This shade compared to the Stay Matte foundation is a little more darker, and I next time I buy this product will probably go one shade lighter. Again I put about a large pea sized amount of this foundation onto my fingertip and then rub this gently onto my face.


Step 3: I do love pastel shades in a lot of my stuff, and that includes some of my eye shadows! For my basic snow make-up I use the Natural Collection 'Mermaid' eye shadow. I am an absolute sucker for NC make-up, its cheap and brilliant quality! I also bought an eye shadow and a small blending brush from Superdrug for about £2, which was a bargain! I use the eye shadow brush and collect a small amount on my brush, I take the eye shadow up to the top of my lip where it creases, and then blend this in so there is no excess eye shadow dusting into your eyes! 


Step 4: Now you would apply some mascara, you don't want too much as your eyelashes may clump or bunch together. I usually use a Victoria Jackson Mascara, but any mascara will do! 

And then you are done! Here is an image of myself with the finished look, it is basic, and very simple, and takes hardly any time at all! You can also add a nice lip gloss, I usually use the Maybelline 'Watershine Gloss' in the shade named 'Cutie Pie' as this has a tint of pink and lasts for ages when applied!


Emma
xoxo