❄❄❄❄❄❄❄❄❄❄❄❄❄❄❄
Today I'm doing a cute little nail tutorial on some super simple and adorable nails!
Step 1 Base Coat
First of all you want to select a red and green and paint your alternate nails in these colours. I decided to mix things up a bit and paint my thumbs grey to make them snowy nails! For the red I used Barry M Hi-Shine Gelly Polish in 'Blood Orange', Rimmel Lasting Finish nail polish in 'Green Grass', and Mavala nail polish in 'Warm Grey'. I applied around 2 coats for the red and grey and 3 for the green as the polish was not as pigmented as the other two polishes. I left mine to dry for about an hour to just make sure they were fully set.
Step 2 Adding the Effects!
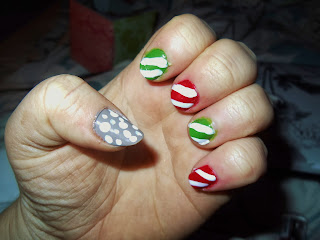
Looking at the image above you can see for the candy canes I added just 2 lines per nail as mine aren't too long at the moment! I used a thin little make-up application brush, its super thin but I still managed to get a tonne of polish on the brush, but you can make your lines thinner if you wish! Then leave these to dry.
The thumbs are super simple as well, basically just apply different sized dots onto your nail and scatter them and be super generous but still being able to see the grey! You can make these predominant or make them very vague to represent snow or both like I did!
The thumbs are super simple as well, basically just apply different sized dots onto your nail and scatter them and be super generous but still being able to see the grey! You can make these predominant or make them very vague to represent snow or both like I did!
Step 3 Protect
Once you have let your nails dry again, you then want to get some clear nail polish just to protect the beautiful work you have just done! Et voila, you're done!
9 days till Christmas!!!!!!
Lots of Love
Emma Victoria
xoxox
❄❄❄❄❄❄❄❄❄❄❄❄❄❄❄


No comments:
Post a Comment